
Nowadays, many car radio systems can play music from various sources, including CDs, portable music players, USB flash drives, SD cards, Bluetooth, and hard disk drives. Their features keep being upgraded nonstop.
But nothing lasts forever; one day your stereo will be old-fashioned or out of order. That’s when you need to remove or replace it with din tools.
Yet, what if you don’t have din tools in that case? How to remove a car stereo without din tools? Continue reading because this post will show you how to make a car stereo removal completely smooth and safe on your own.
Table of Contents
Things You Need Before Removing Car Stereos With No Din Tools
Car stereos wear out or break over time, and you’ll need to replace them. This may appear to be a difficult task, but frankly, it is surprisingly simple. All you’ll need is a few basic tools and a lot of patience. You’ll be able to take out a car radio like an expert once you understand the proper procedure.
Usually, the fastest way to do it is to use din tools. However, if you don’t have any, just look for the familiar tools you can find at your house. Here is a list of items that you need to use to remove a radio from a car:
- A ten-millimeter battery wrench
- A set of slotted screwdrivers
- A pair of long flat-head screwdrivers/knives
- A pry bar made of plastic
5 Detailed Steps to Remove Car Radios Without Din Tools
Step 1: Getting started
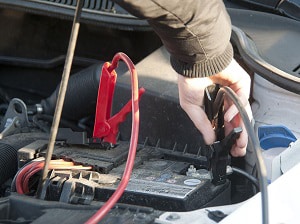
First thing first, the battery must be disconnected as a safety measure. Remove the hood and look for the battery. Remove the wire by unscrewing the nut on the negative terminal first. You should carefully store it on one side of the hood.
The positive terminal should then be unscrewed and moved to the other side of the hood. If the positive terminal comes into contact with any metal elements of the automobile, a spark will occur.
And please note that a red clip on the positive terminal and a black clip on the negative terminal is typical on car batteries. Look for the + or – symbols if the clips aren’t color-coded. You should also never allow the positive and negative wires to come into contact.
Step 2: Removing The Covering Of The Stereo
Remove any screws or bolts that secure the trim. The plastic border surrounding the stereo is called the trim. The audio trim is clipped on in some automobiles, while it may be secured with screws or bolts in others.
Check the trim’s edge for anything that connects it to the dashboard. To release the trim, unscrew the bolts or screws. If there are any bolts or screws, they may be located at the bottom of the stereo trim, out of sight.
Keep track of any screws or bolts you remove so you can put the trim back later. After that, use the flathead screwdriver to remove the radio trim. You may remove the trim in the same way whether it’s fastened with screws or not. Just get the screwdriver under the trim and apply light pressure to detach the trim.
You may have overlooked a screw or bolt if the trim is stuck. Check for any obstructions to the trim and remove them. And be careful when removing the trim. It might be costly to replace if it cracks.
Step 3: Removing The Dash Panel
If your vehicle is newer, it will be more difficult to remove the radio, and instead of just a simple trim, manufacturers may hide your stereo with a whole dashboard panel.
In front of the stereo’s mounting bracket, remove any dash panels. First, insert a plastic pry bar into the gap between the panel’s edges. Next, pull the panel with the pry bar until it pops off, then remove it to reveal the stereo.
Automobile manufacturers do not give the same technique for accessing the audio mounting bracket, so if you’re not sure about it, you can consult your car’s owner’s handbook.
Step 4: Unscrewing The Stereo System
After you’re done with removing the dash panels, you’ll see the stereo system, which is held in place by slotted screws on both sides. To remove the stereo from its mounting bracket, most people use a slotted screwdriver.
If the stereo system isn’t connected to the bracket with screws, you’ll need two flat, sharp items (knives or screwdrivers) to remove it.
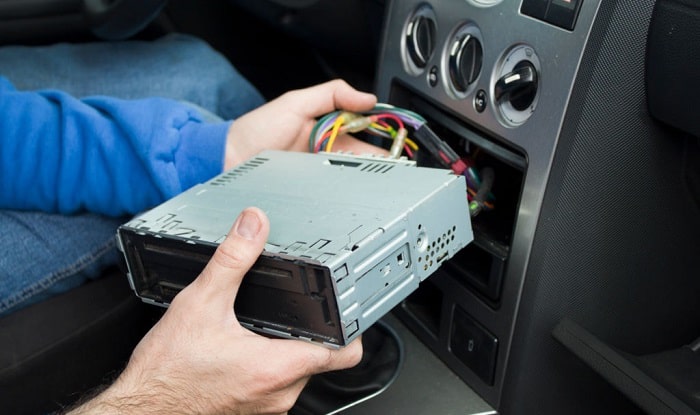
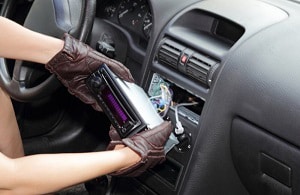
Step 5: Pulling The Stereo Out
On the back of the stereo, there are usually wires. Hence, if you want to avoid paying for new cables, slowly pull the stereo out of the mounting bracket to reveal its rear. However, instead of putting stress on the wires, release them from their binder.
Next, remove the stereo from its mounting bracket, replace it, and reverse the procedures to install the vehicle stereo without the keys.
Read more: Steps to remove xm radio from car.
Frequently Asked Questions
What can I use to remove a car stereo?
You can use so many tools to remove your car stereo. Take a look at the list below:
- DIN Radio Removal Tools
- Keys
- Flathead screwdriver
- Wrench
- Knives
You can even make DIY tools from your domestic materials.
How do I reset my car stereo system?
First, you need to know that only some products or operating systems are applicable here. And you should check 3 things before resetting your car stereo:
- You have all the necessary equipment you need
- Instructions on the replacement of your car’s battery or connectors
- If the radio in your car breaks down
By the way, some models don’t have a reset button, so you should check your manual for model-specific information.
- For reset-button-equipped devices, specifically, in-dash vehicle audio receivers with detachable faceplates (your model number may differ somewhat):
- Take your car stereo’s faceplate off.
- Using a pointed item, such as a ballpoint pen, press the RESET button on the front panel.
- It is required to conduct the BT Initialize method on car stereos containing Bluetooth wireless functions to reset them thoroughly.
- For devices that do not have a reset button:
- Press the DSPL and (back) /MODE, DSLP and CALL, or SOURCE/OFF button for more than two seconds, depending on your car stereo.
- Turn on the radio in your vehicle.
Is there a fuse for a car radio?
Yes, there is. At least one fuse is installed in a vehicle radio to safeguard it from power surges and other electrical problems. This fuse will blow if too much electricity is delivered to the audio system, disconnecting the circuit and saving the main radio.
The entertainment system on newer car versions has a variety of fuses. It’s pretty simple to check the fuses if you’re familiar with a basic voltage or electrical continuity meter.
Usually, merely replacing the faulty fuse will resolve issues. If the replacement fuse blows out soon after installation, however, a particular problem with the electrical system has to be addressed.
How do you remove car speakers?
We summarized here some simple steps you should do to remove your car speakers:
- Before removing any speakers or disconnecting any electronics, unplug the wire from the negative battery terminal
- Remove the trim pieces from the inner door panels to remove door speakers
- Remove any remaining door trim components
- Remove the speakers from the door by unscrewing the screws that hold the speakers in place
Conclusion
That’s it for the guide on how to remove a car stereo without din tools. Now you can do it yourself in a simple, effective, and less time-consuming way. Hopefully, you find the information easy to follow after reading all the basic steps.
Please always remember to be safe first whenever you want to design or repair something yourself, and carefully prepare tools and safety kits before beginning the job. Good luck!

Hi, I am Amaro Frank – the Wind Up Radio’s content editor and writer. Working with Adam is so much fun, as his stories and experiences enrich my knowledge about radio communications and radio accessories. My main tasks in Wind Up Radio are building content and generating great articles on different topics around radio accessories.